DIY Outdoor Serving Window
(Some of the following are affiliate links. Any purchase through these links monetarily supports HIVEhome and HIVEhope Initiatives.)

When renovating a space, so much is done that transforms from a 'before' to an 'after', from new floors, paint and textures, to furniture, decor, and placement choices, but, it's the DIY projects that I always find interesting in making a space unique. The best DIY's solve a problem, allow for good design on a budget, or both! This little project definitely fit those dual purposes, and per usual, I had an idea that I described and Matt manifested. (#Mattsmanifests, should we make this a thing? Or maybe that is his personal blog one day? Ha, a little internal narrative here for you.)
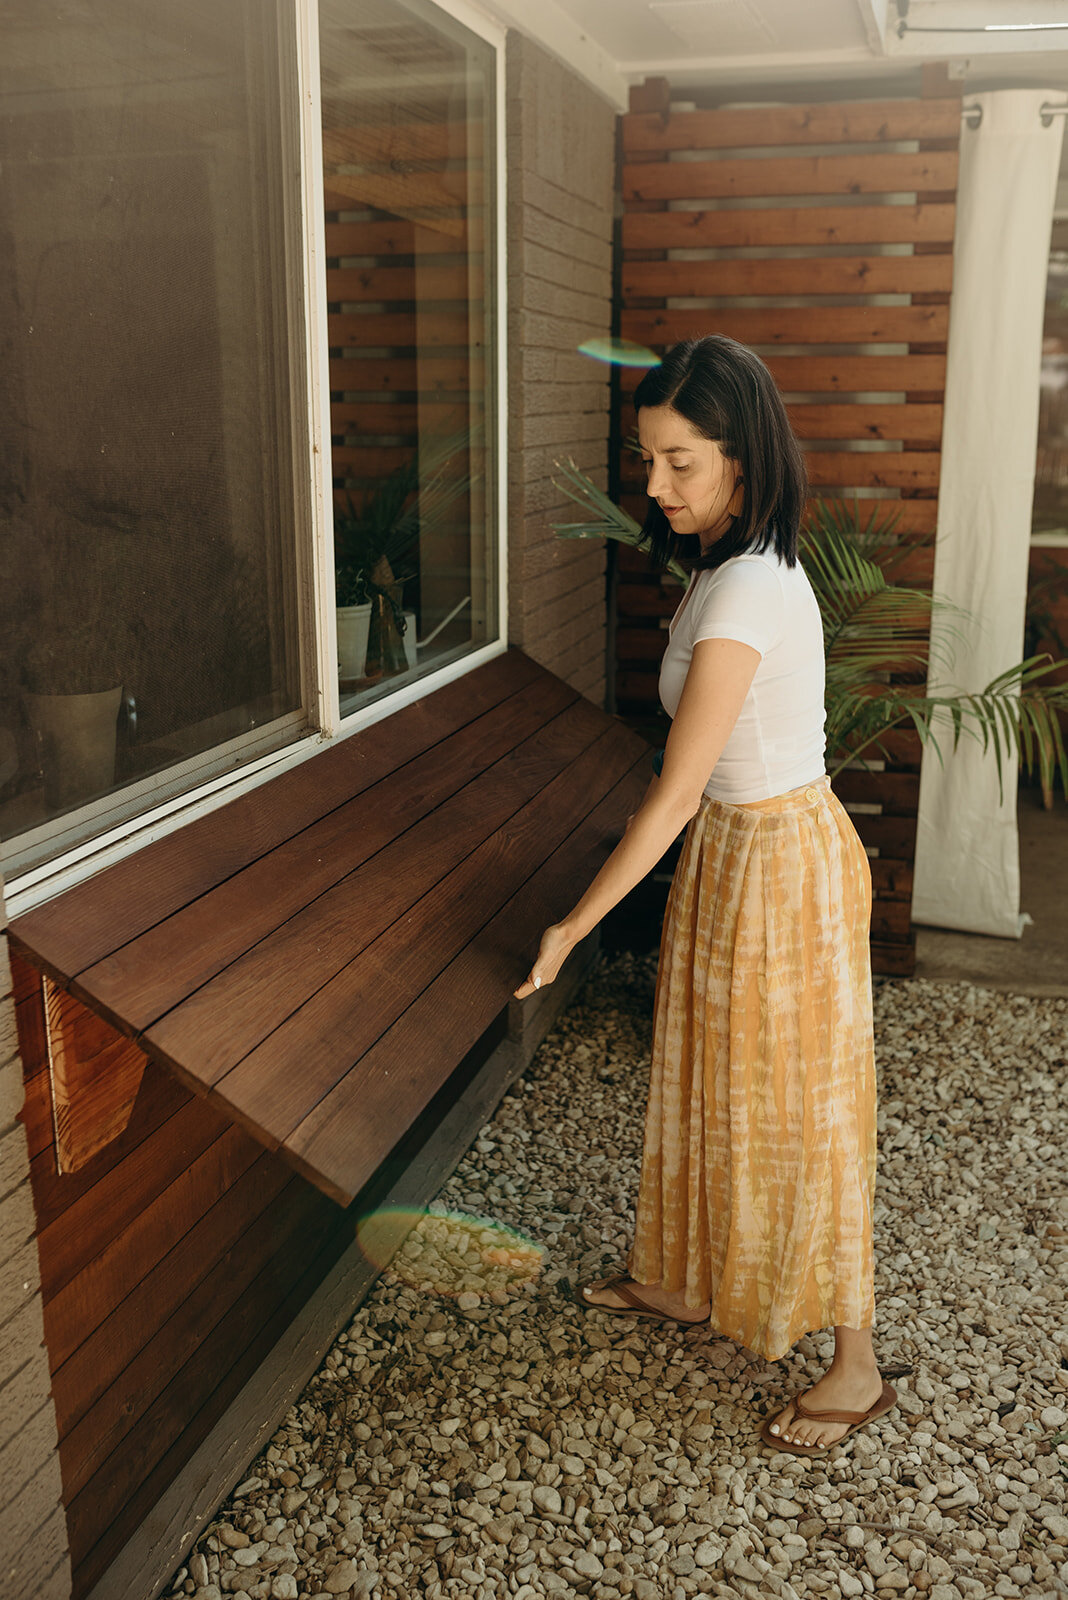
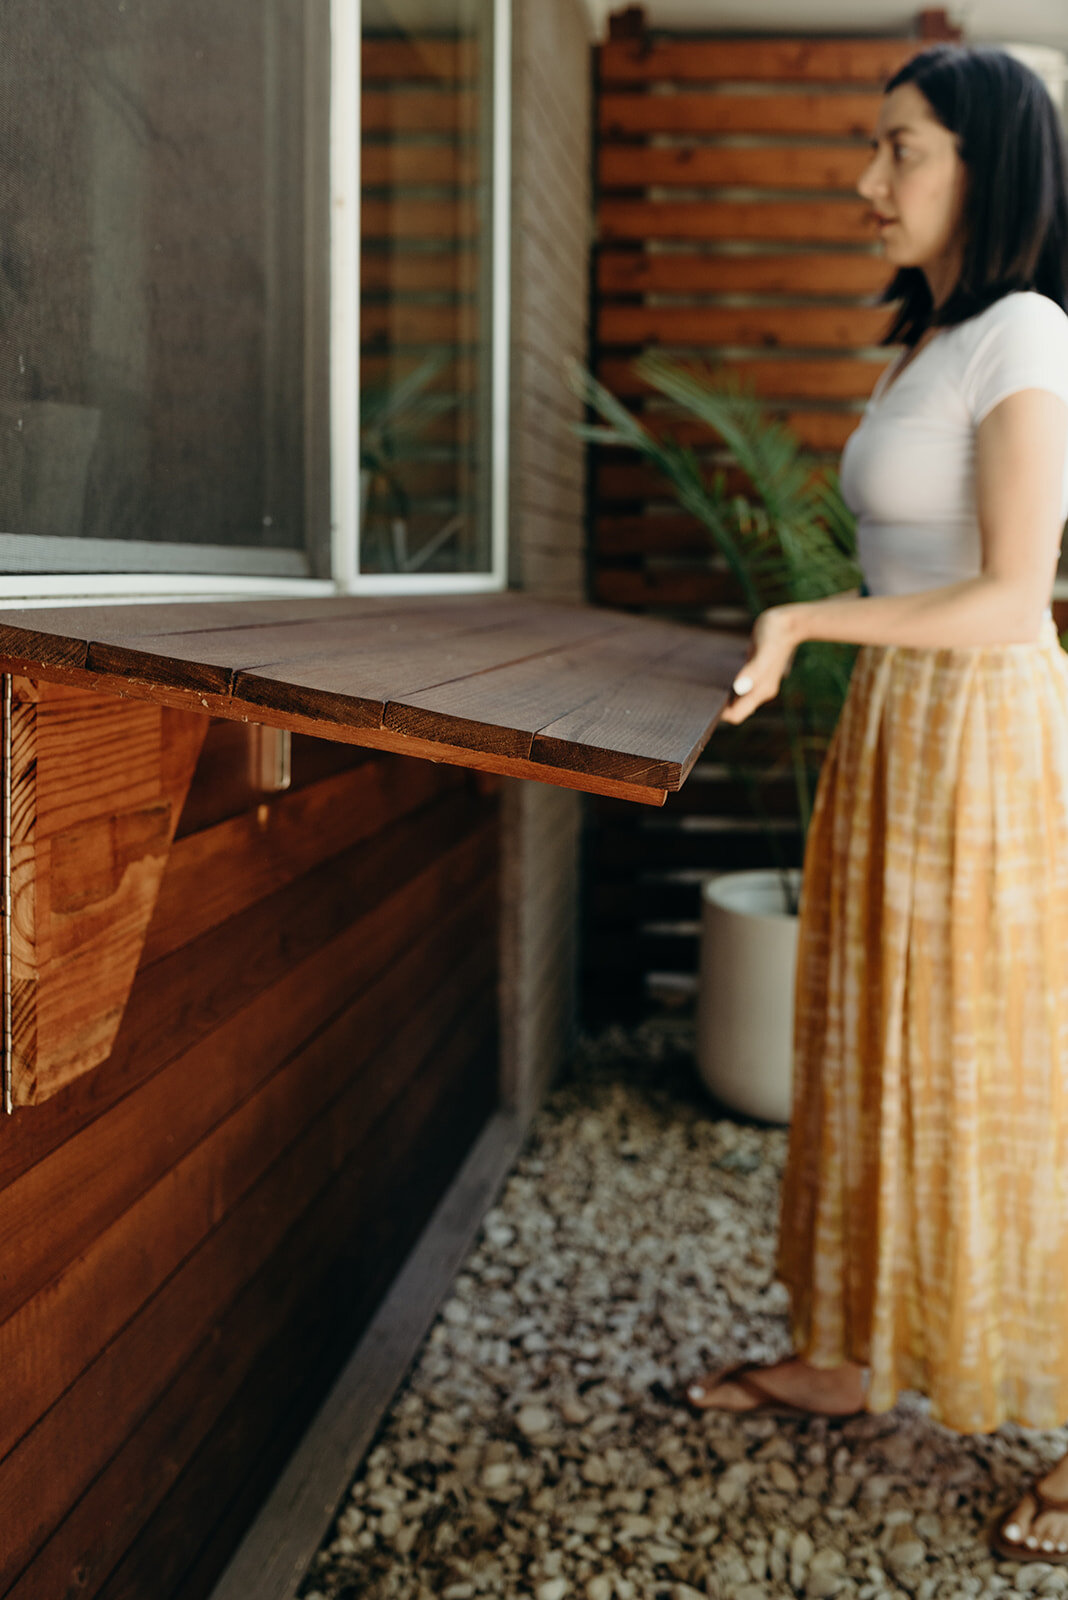
I basically told him I wanted a serving window from the kitchen breakfast nook to our outdoor space allowing guests to walk up and 'order' their food and receive a plate, and as you can see, when we drop it down, you don't even know it is there. I love the whimsy + function, that it takes up less space than a piece of furniture, is virtually invisible until we need it, and a fraction of the cost and upkeep of another item. Win, win, and win. Sometimes I feel like a short-order cook and I relive some of my favorite childhood-play. That said, this little DIY is an excellent place for the kids to create fun interactive space as they pretend and create (Check out our HIVEhome Lemonade Stand!) And, of course we also display drinks, food, utensils, etc. like a buffet.

Alrighty, let's move on to the actual instructions. Had Matt realized when he was making this DIY that I would want him to write about it and give it to the world, he would have taken more notes, or so I was told. ;) But, I am confident he has done a thorough job of re-telling below with full instruction. However, if you feel anything is unclear or you need help making sense of any particular item or have a question, let us know in the comments! We want to hear from you, and we will be prompt with updates.
As always, let us know if you make your own version, and send us pics so we can applaud your DIY glee! It's a thing, and it should be celebrated. Speaking of, this is our first published DIY thanks to my hubby, which I think is appropriate nearing Father's Day. Let's face it. I dream it up. He makes it happen; we celebrate. Repeat.

Matt + Andea Beims
DIY Folding Serving Window
This same concept can be used both inside (for folding desk/table/shelf) or outside for window shelf or buffet.
Materials needed:
TBD - 1x4” Cedar (one side sanded, enough for 5 full length pieces)
1 – 8’ 1x2” Cedar board
15 – 1” deck screws or other outdoor screw
2 – 12” Folding shelf bracket
4 – 1/2” outdoor screws
Instructions:
1. Measure the width of the area for installation.
2. Subtract 3/4” from the total to leave 3/8” gap on each side. (Otherwise issues with level walls or brick can affect the fit.)
3. Cut 5 1x4 (real size is 3/4” x 3 3/8”) cedar boards. Home Depot or Lowes have a good selection, but I especially like the type with one side pre-sanded!
4. (Optional) Use a router with a 1/8” to 1/4” roundover bit on all of the top (sanded) edges of the wood.
5. Sand all exposed faces of the wood to desired smoothness.
6. Cut an 8’ 1x2 (only size available) into 3 16” pieces.
7. Apply Teak Oil to all sides of all wood pieces using a natural bristle brush, according to instructions. Of course, you could substitute paint or stain here as well, but make sure to do it before you clamp + assemble, especially if this is an outdoor installation. Getting in those cracks after it is assembled is impossible!
8. Once your oil (or stain or paint) is dry, lay the 5 1x4 face down on a level surface and clamp together. If you don’t own pipe clamps or other 18”+ clamps, this can optional. Either way, use a square multiple times during the next step to make sure all of your corners remain straight.
9. Lay the 3 1x2s on the 1x4s – one needs to be centered and the other two 1.5” from each end of your shelf. Use 5 screws on each piece – one into each 1x4 – to create a single, solid shelf.
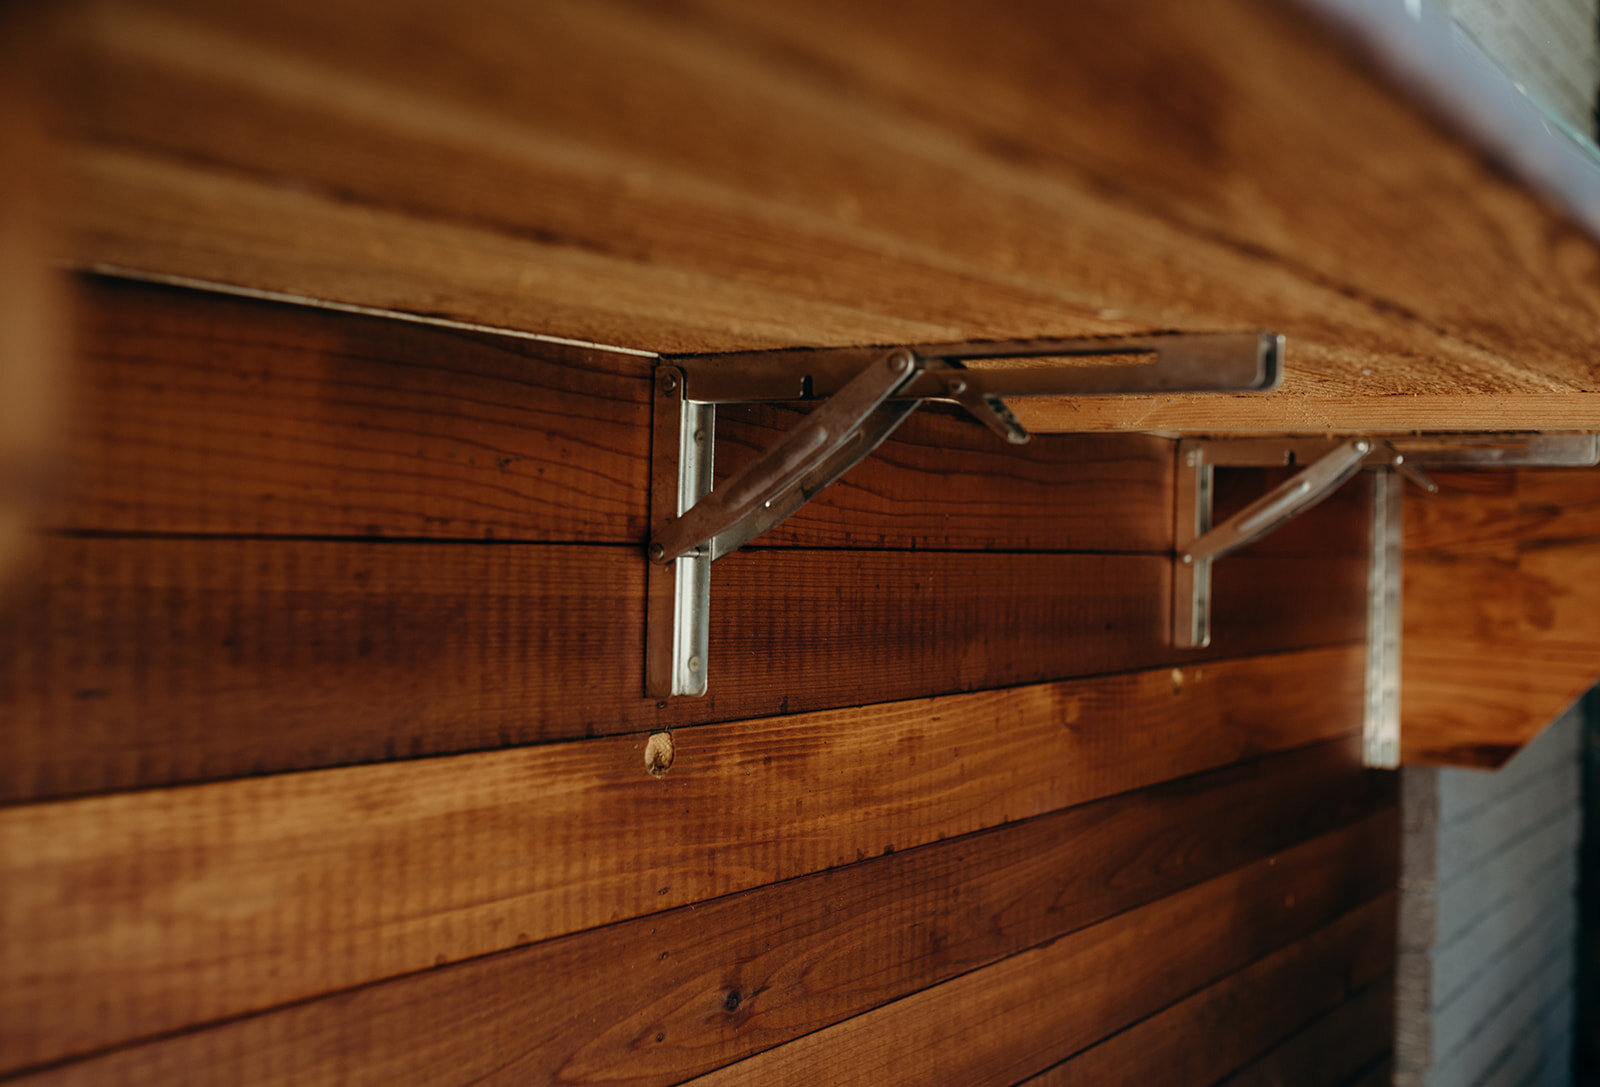
10. Install the shelf brackets on the wall under the window. If possible, try to position the brackets so they can be screwed into studs – even better if you have plywood or solid wood siding under the window. The brackets will need to be at least 17” from each end of the shelf if you are using the optional stabilizing supports, or 4” from each side otherwise.
11. Using a level to keep the bracket perfectly vertical, screw the brackets in 7/8” below the desired raised position of the shelf, as the bracket swings up into position.
12. The latch on these brackets sticks out when folded shut, so you will need to drill a small hole for the latch. Measure 1” below the bottom of the bracket on the wall (centered) and using a 7/8” or 1” spade bit, drill a hole 1/2” deep. To ensure you don’t go too deep, use tape to mark 1/2” on the bit.
13. You will need help for this next part! Lift the brackets to raised position and have a helper center the shelf on the brackets, flat against the wall or window. Using 1/2” screws, attach the brackets to the shelf from below.
14. OPTIONAL: If your shelf is over 4’ wide, it is recommended you install stabilizing supports.
15. For the boards, if you use a 1x12 cedar board, the actual width is 11.25”, meaning the 12” hinge will have a 3/4” overhang. I used this 12” edge-glued pine board from Lowes that is exactly 12” wide. It isn’t as long-lasting as the cedar, but should do fine for years under the shelf, especially with oil/stain applied.
16. Cut the 12” board to size. Measure from the inside of the left 1x2 to the first folding shelf bracket and subtract 2”. The size should range from 8” to 12” max.
17. Measure 4” from the top (shelf side of the board) and 4” from the back (floor side of the board). Draw a line between the 2 measurements and, using a circular saw, cut along the line. This creates an angle that both looks great and saves your knees!
18. Oil/stain/paint the wood to match the shelf. The pine will be different color than the cedar, but since this isn’t really seen, it should be OK.
19. Install a 12” stainless-steel piano hinge on the inside (both supports will fold inward) back edge of each support, level with the top (hinge may overlap the bottom of the board).
20. Open the shelf and hold the support against the shelf, flat against the inside of the 1x2 (do this on both the left and right sides) and screw into the wood/siding.


CREDITS:
Co-Authors + DIY - Matt & Andea Beims
Photos by HIVEhome team-member + Honey in the HIVE - Jessica Collins of https://jessicacollins.photography.
Editing + Publishing by team-member + Honey in the HIVE- Andrea Haney.
ENJOY THIS POST? PIN IT + SHARE IT!


HIVEhome is a participant in the Amazon Services LLC Associates Program, an affiliate advertising program designed to provide a means for sites to earn advertising fees by advertising and linking to Amazon.com.